Brian's DIY Woodie Wall
Like most people who call themselves climbers, climbing is important to me. While our climbing gym is closed, I'm sure there are more than a few of you climbers out there who are merely holding together a veneer of sanity for the sake of those in social isolation with you. We've seen this already starting to crack, just days in, with FAs like Bricked the Traverse, Staircase V2+, and My Kitchen 5.9. It seems like almost everything someone can grab, pinch, crimp, slap, or jam has been done. Shelves have been manteled and counters have been heelhooked. I think soon we'll start seeing the ice gear come out as people realize picks stick in more than ice. Just remember that those things are sharp and the hospital has enough to worry about.
I would be firmly in the insanity camp if not for a fortunate night several months ago when I found myself climbing on a friends garage climbing wall. A diminutive structure, merely 8'x8', when compared to the towering 15' walls of Ascend. But still, my eyes were reopened to the awesomeness of the home wall. I've been working in climbing gyms for a long time, but when I first started climbing it was on a wall in a barn. That barn caved in and my climbing moved to a garage and then a tower in my parents' backyard. I'm no stranger to DIY climbing walls, but as a gym employee in some capacity for roundabout a decade, I thought I'd moved passed them.
Oh, was I wrong.Commercial gyms like ASCEND are fantastic places to climb. The community, vibe, and space; climbing with all of your friends; projecting and sending with a crew of supportive climbers- these things are what I climb at the gym for. But if I want to throw down and try really, really hard there's no better place than a board, including spray walls. Boards let you work specific skills or weaknesses and adjust difficulties of boulders easily to challenge you appropriately. Climbing on my friend's garage those couple of months ago reminded me of what climbing was like when I first started and I didn't need anything besides a wall to climb on.
I decided that night on my friend's wall that I would build myself a little board in my own garage. But as the weeks went by I never found the time, never motivated, and never started. Enter Covid-19. The day after all non-essential businesses in PA were ordered to shut their doors, including our own ASCEND, I started construction on my garage board. Four partial days later I'm now the proud owner of a freestanding, a-frame, 8'x8' diminutive little board. I documented the process and am going to share with you how I decided to build and use it. Below you'll find pictures, descriptions, and a link to videos on ASCEND's YouTube channel. I'm hoping this helps you to fill some time and get psyched to train, either at home or when we get back to ASCEND, but if someone does decide to build their own board please don't hesitate to get ahold of me.
Disclaimer: I'm a climber, routesetter, and coach- not a construction foreman or engineer. The way I built this wall is a tried and true design for home walls, but of course, yes your own best judgment. I don't condone following any of my instructions on anything ever, and if you do you should seriously reconsider. Happy building.
Watch Brian build the wall here. Read on for his tips and insights.
Supplies A quick stop at Lowes to pick up the home climbing wall essentials.2-4x8 sheets of 23/32" (close to 3/4") plywood. Because I can't fit 4x8 sheets in my SUV I asked the Lowes employee to cut them into 4x4 sheets, which made it slightly more complicated to frame but better than ratcheting them to my roof.18-2x6x8 - This seems like a lot but I used all but 6' of one. I could've used two 10' boards. but 8' maxed out my carrying capacity. 2- 6" carriage bolts with washers and nuts - At this point I thought I may add another support so I'd have to go through three 1.5" thick boards. Turns out I didn't so a 4" bolt would've worked. 1 5lb box of 2.5" screws - I got a big box in case I wanted to build some other features. The 2.5" screws are just long enough to go through a 2x6 and into another with me still feeling good about it. Three inch screws would be better, but I also used some of these to attach plywood and 3" seemed overkill for that. 1 1lb box of 1,5/8" screws - I got these to attach plywood. I also wanted extra to attach holds to the wall. This is the perfect size for most screw ons and jibs.Other things you need but I already have or borrowed-Impact driver/drillDrill bits (pilot hole bit, screw bit, 7/16" paddle bit, 1/2" drill bit)HammerMiter saw (not 100% necessary but nice to have)circular sawTape measureAdjustable crescent wrenchabout 200 T-nuts - I used 4 prong pound in tnuts because they're much cheaper but screw in tnuts are the way to go. If you don't mind using a little more care when attaching holds then pound ins are fine. Slow drive homeI thought I'd forgotten the ratchet straps, turns out they were hidden under the rope in the back, so I used some other rope to tie the 2x6s together and drove home very slowly. These only shifted once, but in that split second I thought my back windshield had had it.
FramingI basically am trying to make an 8' square box with studs running every 16", just like an actual wall. As it lays the long side is 8'+3"=99" because of the thickness of the end boards (1.5"x2). My next step will be to cut the studs down and then screw it all together nice and mostly square.
Raising and BracingMy brother came over to hold this up so that I could attach the braces to the front. I was going to try and do it alone but I'd have had to cut the braces short enough to swing through vertical while I raised it which I didn't want to do. The carriage bolt is through the top of the wall and brace. I supplemented that with screws. Holding the base of the A together I tied two 2x6s together with screws then used that board to span the bottom. If done this way the one board acts as a spacer so that the brace can come to the ground without twisting. It also saves you from having to make any angled cuts.
Stoodup with Hangboard boxThe boards in the center of the wall are placed to catch the top of the plywood I had cut into 4' sections. I built the hangboard box to sit out from the wall and cut more 2x6 to catch the new plywood seams the box created. The front edge of these 2x6s had to be cut at the wall angle (33*) so the plywood could sit flat, unlike the center boards that only had to be cut to the space between the studs.
HangboardI raised the hang board up by adding 2x6 to the box, then adding an old 2x8 to that. I did this so that the micro edges below would have space and I can curl my fingers and so that I can hang more upright on the hang board.
Plywood on and pull up barBesides holding it in place myself attaching the plywood was an easy step. I'm not overly concerned with small gaps as long as I won't chip or catch edges while I'm climbing. I did add a pull up bar to the left side of the wall using scrap 2x6, plywood, a couple tnuts, and an old brace. Having this will let me do weighted pull ups with more weight than I would be able to manage on the hang board and let me work one arm lockoffs without worrying about my fingers being the limiting factor.
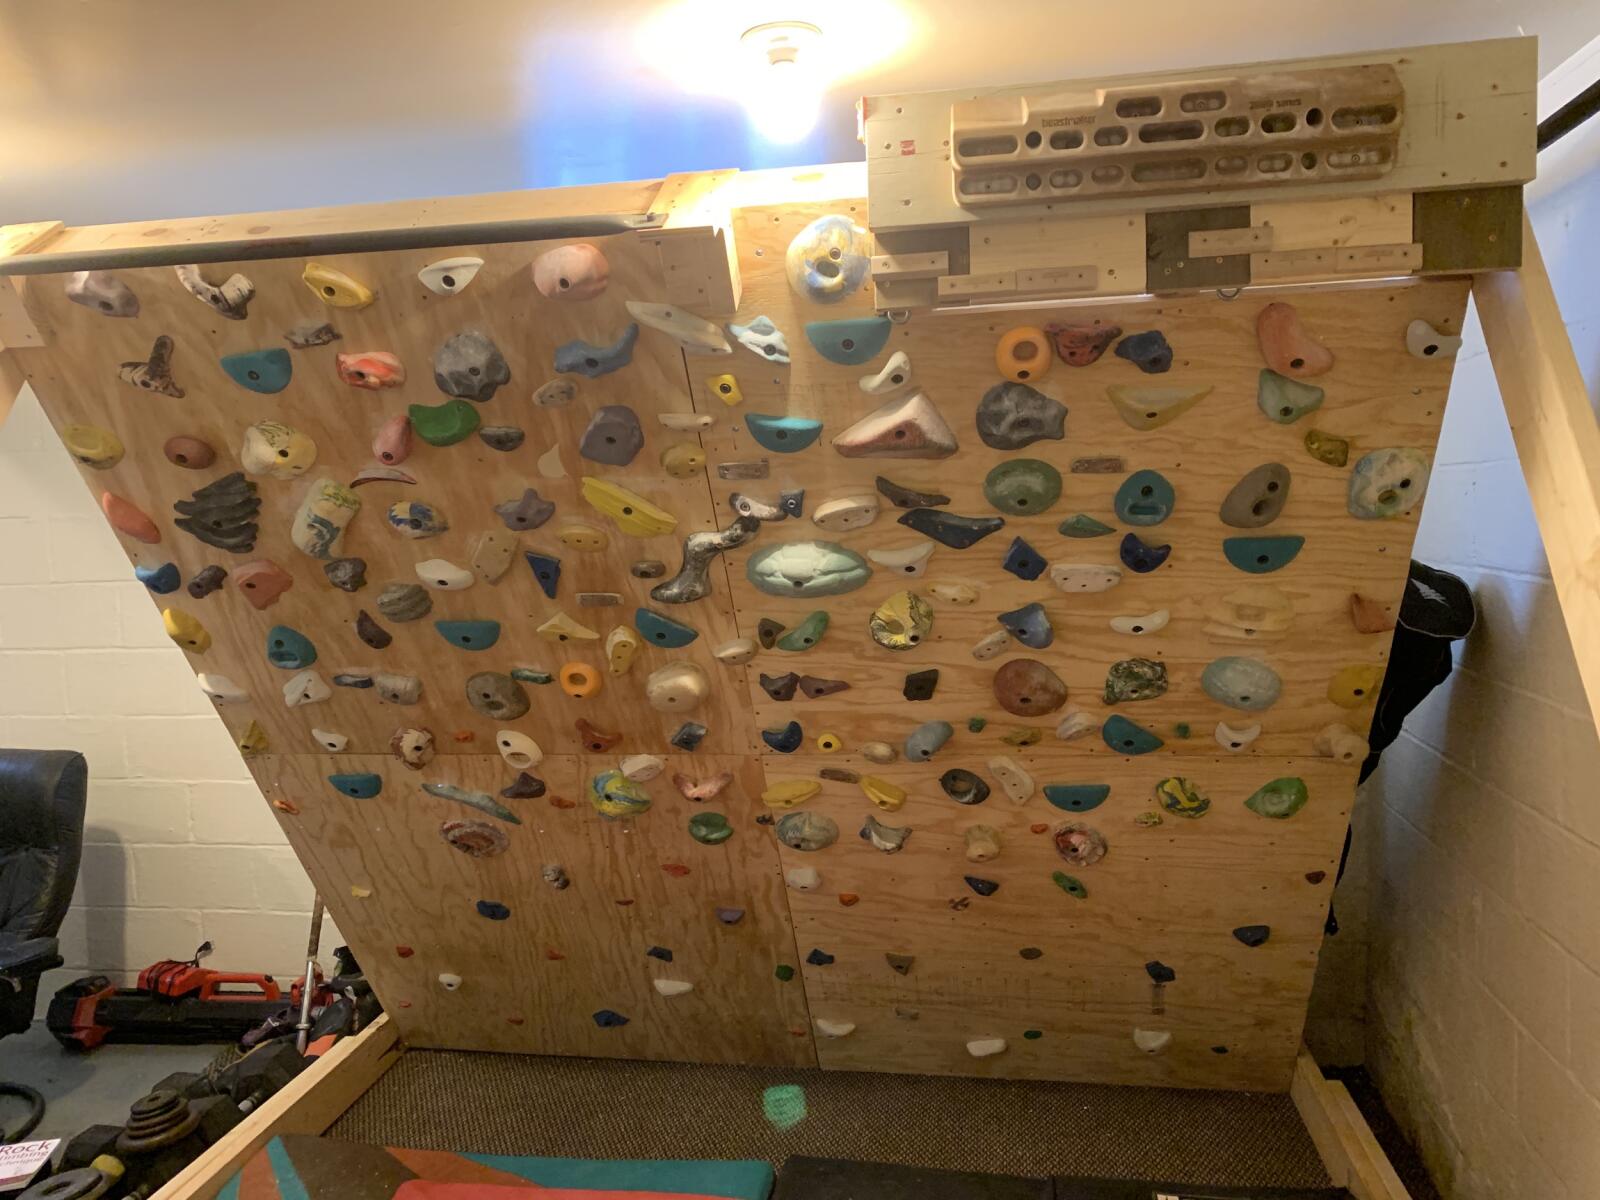
Holds on and time to train!The finished board! I started putting holds on by deciding what I wanted from the board, setting training goals, and seeing what types of holds I had to use. I decided that I'm going to mostly train on this board in three ways.
I'm going to use it to train a technical weakness of mine. I'm uncomfortable being uncomfortable, so I'm going to use this board to train to try hard on holds I don't like, in positions I don't want to be in, and on feet that are hard to trust. I think this is where I'm going to make the biggest steps forward. Often this is going to be very close to limit bouldering for me (though I want this theme to run through most of my problems on the board) so I need holds on the board I'll find challenging for time to come. I'm going to use the board to get physically stronger. To do this I need holds and movements on the board that are challenging but that I can use right away to create boulders that are semi hard for me that I can repeat in various states of fatigue. I want to be able to train 20 move endurance on the board. I chose twenty moves because I think it's a good benchmark number for cruxes of hard routes and long boulder problems. To train this type of endurance I'll need holds on the wall that force me to keep going (no resting!), but don't spit me off too soon. For me on this angle I'm looking for incut 1 pad edges, deep pockets, or flat 1.5-2 pad edges and pinches.As I started selecting holds to use I tried to think about how versatile each hold could be in the position I was choosing for it. While the size of the hold matters, especially for the type of training I want to do on the board, its orientation and positioning really determine how often I'll use it and a well placed woodie wall hold is one that gets used often. I tried to create little boulders and small sequences of moves so that holds flowed together. I tried to balance these sequences so that one side or type of movement didn't dominate. If I noticed that I'd always start on the right side of the wall I'd ask myself why and try to create better start options on the left. Or if there were feet on the board that didn't get used I'd ask myself if I avoided them because they aren't useful or if I'm not using them because they make me uncomfortable and try hard.
What's really going to make this board mine is how I tailor it to hit all my weakest points in ways that are just hard enough that I can still push through them. Getting better at climbing, or anything really, is hard. I'm luckier than most climbers to be able to build this thing in my house. But just having the tool isn't enough, I'll have to use it. And not just use it, but use it mindfully to create small, uncomfortable situations that will give me the opportunity to learn. I can only create these opportunities if I approach training intentionally, knowing what to practice and how, and willing to submit myself to moments that will be, by necessity, uncomfortable.
When you come back to the gym, when we're far enough ahead of this thing, try to find those little moments in your climbing that make you uncomfortable and instead of shying away from them ask yourself why. Be specific and honest in your answer. Is that foot really too bad to stand on? Do you actually need to be stronger to do that move? Do you actually have to cut your feet to reach that hold? How bad is that sloper really? Sometimes the answer is get stronger, but most often we are capable of more than we think. Intentionally set out to practice making those little moments less uncomfortable by placing yourself in those situations aware of what you're doing and why. Treat those moments as opportunities to learn. And if you need help, ask. ASCEND, the place and the company, is pretty awesome with a lot of experienced and smart people who are always willing to help.
Stay safe everyone,-Brian Pascuzzi, Head Routesetter